#git init
Explore tagged Tumblr posts
Text

Welcome back, coding enthusiasts! Today we'll talk about Git & Github , the must-know duo for any modern developer. Whether you're just starting out or need a refresher, this guide will walk you through everything from setup to intermediate-level use. Let’s jump in!
What is Git?
Git is a version control system. It helps you as a developer:
Track changes in your codebase, so if anything breaks, you can go back to a previous version. (Trust me, this happens more often than you’d think!)
Collaborate with others : whether you're working on a team project or contributing to an open-source repo, Git helps manage multiple versions of a project.
In short, Git allows you to work smarter, not harder. Developers who aren't familiar with the basics of Git? Let’s just say they’re missing a key tool in their toolkit.
What is Github ?
GitHub is a web-based platform that uses Git for version control and collaboration. It provides an interface to manage your repositories, track bugs, request new features, and much more. Think of it as a place where your Git repositories live, and where real teamwork happens. You can collaborate, share your code, and contribute to other projects, all while keeping everything well-organized.
Git & Github : not the same thing !
Git is the tool you use to create repositories and manage code on your local machine while GitHub is the platform where you host those repositories and collaborate with others. You can also host Git repositories on other platforms like GitLab and BitBucket, but GitHub is the most popular.
Installing Git (Windows, Linux, and macOS Users)
You can go ahead and download Git for your platform from (git-scm.com)
Using Git
You can use Git either through the command line (Terminal) or through a GUI. However, as a developer, it’s highly recommended to learn the terminal approach. Why? Because it’s more efficient, and understanding the commands will give you a better grasp of how Git works under the hood.
GitWorkflow
Git operates in several key areas:
Working directory (on your local machine)
Staging area (where changes are prepared to be committed)
Local repository (stored in the hidden .git directory in your project)
Remote repository (the version of the project stored on GitHub or other hosting platforms)
Let’s look at the basic commands that move code between these areas:
git init: Initializes a Git repository in your project directory, creating the .git folder.
git add: Adds your files to the staging area, where they’re prepared for committing.
git commit: Commits your staged files to your local repository.
git log: Shows the history of commits.
git push: Pushes your changes to the remote repository (like GitHub).
git pull: Pulls changes from the remote repository into your working directory.
git clone: Clones a remote repository to your local machine, maintaining the connection to the remote repo.
Branching and merging
When working in a team, it’s important to never mess up the main branch (often called master or main). This is the core of your project, and it's essential to keep it stable.
To do this, we branch out for new features or bug fixes. This way, you can make changes without affecting the main project until you’re ready to merge. Only merge your work back into the main branch once you're confident that it’s ready to go.
Getting Started: From Installation to Intermediate
Now, let’s go step-by-step through the process of using Git and GitHub from installation to pushing your first project.
Configuring Git
After installing Git, you’ll need to tell Git your name and email. This helps Git keep track of who made each change. To do this, run:

Master vs. Main Branch
By default, Git used to name the default branch master, but GitHub switched it to main for inclusivity reasons. To avoid confusion, check your default branch:

Pushing Changes to GitHub
Let’s go through an example of pushing your changes to GitHub.
First, initialize Git in your project directory:

Then to get the ‘untracked files’ , the files that we haven’t added yet to our staging area , we run the command

Now that you’ve guessed it we’re gonna run the git add command , you can add your files individually by running git add name or all at once like I did here

And finally it's time to commit our file to the local repository

Now, create a new repository on GitHub (it’s easy , just follow these instructions along with me)
Assuming you already created your github account you’ll go to this link and change username by your actual username : https://github.com/username?tab=repositories , then follow these instructions :


You can add a name and choose wether you repo can be public or private for now and forget about everything else for now.

Once your repository created on github , you’ll get this :

As you might’ve noticed, we’ve already run all these commands , all what’s left for us to do is to push our files from our local repository to our remote repository , so let’s go ahead and do that

And just like this we have successfully pushed our files to the remote repository
Here, you can see the default branch main, the total number of branches, your latest commit message along with how long ago it was made, and the number of commits you've made on that branch.

Now what is a Readme file ?
A README file is a markdown file where you can add any relevant information about your code or the specific functionality in a particular branch—since each branch can have its own README.
It also serves as a guide for anyone who clones your repository, showing them exactly how to use it.
You can add a README from this button:

Or, you can create it using a command and push it manually:

But for the sake of demonstrating how to pull content from a remote repository, we’re going with the first option:

Once that’s done, it gets added to the repository just like any other file—with a commit message and timestamp.
However, the README file isn’t on my local machine yet, so I’ll run the git pull command:

Now everything is up to date. And this is just the tiniest example of how you can pull content from your remote repository.
What is .gitignore file ?
Sometimes, you don’t want to push everything to GitHub—especially sensitive files like environment variables or API keys. These shouldn’t be shared publicly. In fact, GitHub might even send you a warning email if you do:

To avoid this, you should create a .gitignore file, like this:

Any file listed in .gitignore will not be pushed to GitHub. So you’re all set!
Cloning
When you want to copy a GitHub repository to your local machine (aka "clone" it), you have two main options:
Clone using HTTPS: This is the most straightforward method. You just copy the HTTPS link from GitHub and run:

It's simple, doesn’t require extra setup, and works well for most users. But each time you push or pull, GitHub may ask for your username and password (or personal access token if you've enabled 2FA).
But if you wanna clone using ssh , you’ll need to know a bit more about ssh keys , so let’s talk about that.
Clone using SSH (Secure Shell): This method uses SSH keys for authentication. Once set up, it’s more secure and doesn't prompt you for credentials every time. Here's how it works:
So what is an SSH key, actually?
Think of SSH keys as a digital handshake between your computer and GitHub.
Your computer generates a key pair:
A private key (stored safely on your machine)
A public key (shared with GitHub)
When you try to access GitHub via SSH, GitHub checks if the public key you've registered matches the private key on your machine.
If they match, you're in — no password prompts needed.
Steps to set up SSH with GitHub:
Generate your SSH key:

2. Start the SSH agent and add your key:

3. Copy your public key:

Then copy the output to your clipboard.
Add it to your GitHub account:
Go to GitHub → Settings → SSH and GPG keys
Click New SSH key
Paste your public key and save.
5. Now you'll be able to clone using SSH like this:

From now on, any interaction with GitHub over SSH will just work — no password typing, just smooth encrypted magic.
And there you have it ! Until next time — happy coding, and may your merges always be conflict-free! ✨👩💻👨💻
#code#codeblr#css#html#javascript#java development company#python#studyblr#progblr#programming#comp sci#web design#web developers#web development#website design#webdev#website#tech#html css#learn to code#github
93 notes
·
View notes
Text
Remember
When you write utility tools that are not specific to your workplace enviroment and you might want to use them at the next place you work.
Then make sure there is no way to prove that your code was made at your work.
Don't check it into a remote git ( just write git init and do it locally). Don't let Onedrive see it.
And then just move it back and fourth to update versions with a flash drive.
Remember.
It is not just ok to steal from your workplace, it is the ethical choice.
Think of it as "wealth distribution towards equality"
Or "Eat the rich"
Or "copyright is only a thing for your corperate masters. Your copyright is called "you are training data""
#codeblr#programming#coding#softeware#software developer#software#software development#git#punk#anti capitalism#capitalism#ai
14 notes
·
View notes
Text
Mini Python Study

Saturday 5th August 2023
It’s Saturday and I’m already dreading to go into work on Monday, like help! 😖💔
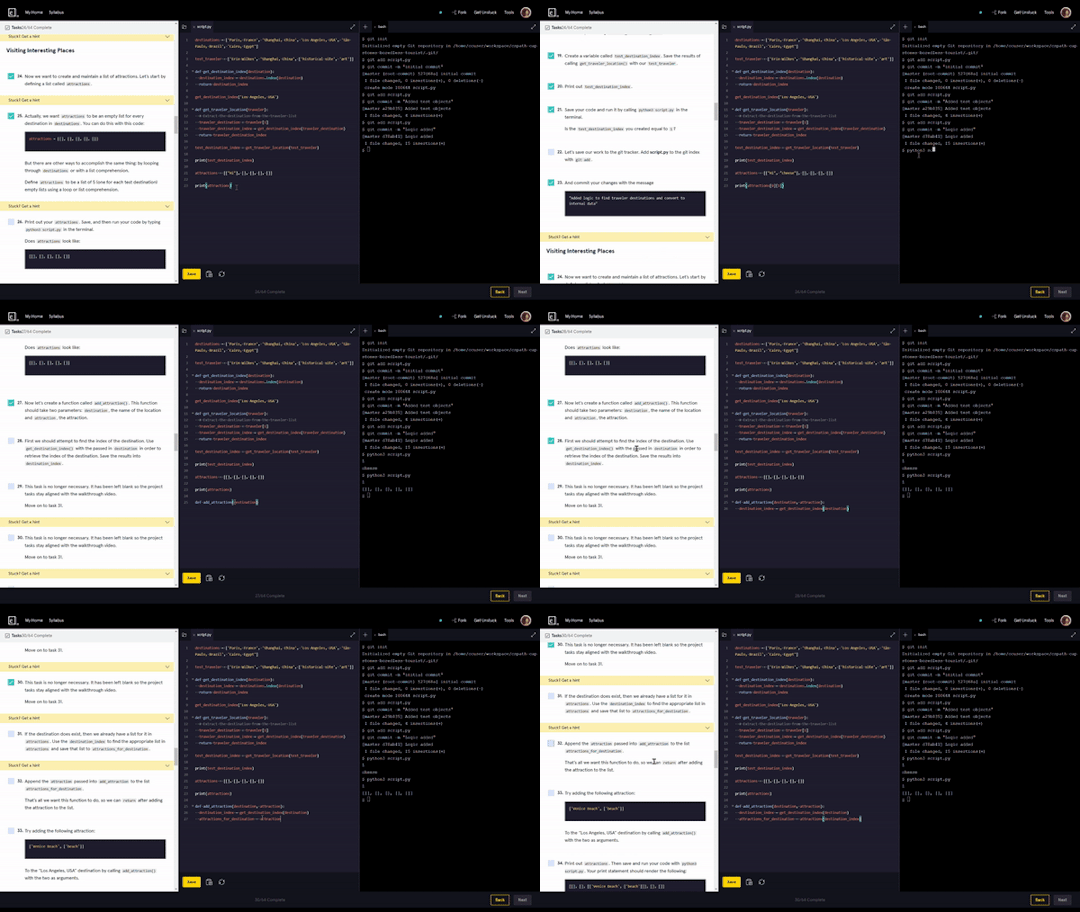
Anyhoo, as I’m in like a state where I don’t want to do anything, that including work, but I’m not giving up so I did 30 mins of Python study on Codeacedemy. Just working with Python lists, functions and Git commands like git init and git add etc 💻
It’s not much but to put me back into the groove of things. Another idea I had was to back to old unfinished projects and essentially complete them! Well, at least try…! ✨
I hope everyone’s doing okay! Seeing some new people in the codeblr community and posting which is awesome! Hi hello welcome! And thanks to the people who helped give advice about burnouts and how to get out of them! 🤗💗
#xc: studies#coding#codeblr#progblr#programming#studyblr#studying#comp sci#computer science#programmer
73 notes
·
View notes
Text
GitHub and Git Commands: From Beginner to Advanced Level
Git and GitHub are essential tools for every developer, whether you're just starting or deep into professional software development. In this blog, we'll break down what Git and GitHub are, why they matter, and walk you through the most essential commands, from beginner to advanced. This guide is tailored for learners who want to master version control and collaborate more effectively on projects.
GitHub and Git Commands
What Is Git?
Git is a distributed version control system created by Linus Torvalds. It allows you to track changes in your code, collaborate with others, and manage your project history.
What Is GitHub?
GitHub is a cloud-based platform built on Git. It allows developers to host repositories online, share code, contribute to open-source projects, and manage collaboration through pull requests, issues, and branches
Why Learn Git and GitHub?
Manage and track code changes efficiently
Collaborate with teams
Roll back to the previous versions of the code
Host and contribute to open-source projects
Improve workflow through automation and branching
Git Installation (Quick Start)
Before using Git commands, install Git from git-scm.com.
Check if Git is installed:
bash
git --version
Beginner-Level Git Commands
These commands are essential for every new user of Git:
1. git init
Initialises a new Git repository.
bash
git init
2. git clone
Clones an existing repository from GitHub.
bash
git clone https://github.com/user/repo.git
3. git status
Checks the current status of files (modified, staged, untracked).
bash
git status
4. git add
Stage changes for commit.
bash
git add filename # stage a specific file git add . # stage all changes
5. git commit
Records changes to the repository.
bash
git commit -m "Your commit message"
6. git push
Pushes changes to the remote repository.
bash
git push origin main # pushes to the main branch
7. git pull
Fetches and merges changes from the remote repository.
bash
git pull origin main
Intermediate Git Commands
Once you’re comfortable with the basics, start using these:
1. git branch
Lists, creates, or deletes branches.
bash
git branch # list branches git branch new-branch # create a new branch
2. git checkout
Switches branches or restores files.
bash
git checkout new-branch
3. git merge
Merges a branch into the current one.
bash
git merge feature-branch
4. git log
Shows the commit history.
bash
git log
5. .gitignore
Used to ignore specific files or folders in your project.
Example .gitignore file:
bash
node_modules/ .env *.log
Advanced Git Commands
Level up your Git skills with these powerful commands:
1. git stash
Temporarily shelves changes not ready for commit.
bash
git stash git stash apply
2. git rebase
Reapplies commits on top of another base tip.
bash
git checkout feature-branch git rebase main
3. git cherry-pick
Apply the changes introduced by an existing commit.
bash
git cherry-pick <commit-hash>
4. git revert
Reverts a commit by creating a new one.
bash
git revert <commit-hash>
5. git reset
Unstages or removes commits.
bash
git reset --soft HEAD~1 # keep changes git reset --hard HEAD~1 # remove changes
GitHub Tips for Projects
Use Readme.md to document your project
Leverage issues and pull requests for collaboration
Add contributors for team-based work
Use GitHub Actions to automate workflows
Final Thoughts
Mastering Git and GitHub is an investment in your future as a developer. Whether you're working on solo projects or collaborating in a team, these tools will save you time and help you maintain cleaner, safer code. Practice regularly and try contributing to open-source projects to strengthen your skills.
Read MORE: https://yasirinsights.com/github-and-git-commands/
2 notes
·
View notes
Text
tl;dr Tumblr'n in Emacs
An update for the Emacs fans, it turns out, yes, it does now kinda work even nicer than before, where it works, but there are still features left to be included.
using the tumblesocks from elpa, I removed prior (invalid) oauth tokens and ran the api-test again to get a new key. once installed back in Emacs, I could login and I did that previous post, but I the views did not work.
I found a /modernized/ fork at https://codeberg.org/martianh/tumblesocks and did a git-clone of that into =~/.emacs/lisp=, and =(requires ‘tumblesocks)= in my init. I didn’t bother with the other recommended packages, restarted Emacs and could reach my dashboard, step through posts, reblog with a comment and visit blogs and posts+comments.
The view is very much like EWW or the Mastodon.el, and it is a little more intelligent than the latter about framing a post. you get to see a whole post with the point put near the bottom, but it is misleading that you are /seeing/ this post, but any actions will be applied to the /next/ post.
Sadly I could reblog or visit, but =l= it didn’t /Like/. (notice I’m re-testing Markdown while I’m at it), while viewing a post I couldn’t find a means to /add/ a comment, and while there are links top and bottom to next and previous pages, both just reload the current page and /call/ it by the expected number. I can’t guarantee it isn’t something messed up in my config, some relic from the tumblesocks past.
2 notes
·
View notes
Text
WIP Wednesday Developer Log 1/31/2024
In Progress Screenshot
Devlog
This week I had enough bits and pieces put together to start setting up my main menu and the cut scenes that lead into the first memory. I set up the main menu and the background music, as well as ensured that the accessible menu worked on all the different parts of the cut scene and the main menu.
The settings menu got pulled out into its own component, and added to the main menu so that people can change the settings before starting the game. I also made it so that the New Game button starts the game immediately by transitioning to the backstory about Thrinar.
The cut scene itself was designed by using awaits; awaiting on button presses allows the animated cutscene to play in the background and loading all the necessary components (such as the map) to occur in the background while the player reads the story at their own pace. (Or has it narrarated, for blind and low vision players).
Once the player has read the whole story, and everything has loaded, the cutscene transitions into the gameplay for the inital memory - orbit.
Roundup of all Git commits this week:
Added ecosystems page in Echiridion GUI
Added outline for Main menu
Main menu loads settings, new game, and quits
Added cutscene that transitions to memory
Fixed a long loading bug in the cutscene that was caused by loading all the voices for TTS
Connected the main menu to the intro cutscene
2 notes
·
View notes
Text
You can learn Git easily, Here's all you need to get started:
1.Core:
• git init
• git clone
• git add
• git commit
• git status
• git diff
• git checkout
• git reset
• git log
• git show
• git tag
• git push
• git pull
2.Branching:
• git branch
• git checkout -b
• git merge
• git rebase
• git branch --set-upstream-to
• git branch --unset-upstream
• git cherry-pick
3.Merging:
• git merge
• git rebase
4.Stashing:
• git stash
• git stash pop
• git stash list
• git stash apply
• git stash drop
5.Remotes:
• git remote
• git remote
• add git
• remote remove
• git fetch
• git pull
• git push
• git clone --mirror
6.Configuration:
• git config
• git global config
• git reset config
7. Plumbing:
• git cat-file
• git checkout-index
• git commit-tree
• git diff-tree
• git for-each-ref
• git hash-object
• git Is-files
• git Is-remote
• git merge-tree
• git read-tree
• git rev-parse
• git show-branch
• git show-ref
• git symbolic-ref
• git tag --list
• git update-ref
8.Porcelain:
• git blame
• git bisect
• git checkout
• git commit
• git diff
• git fetch
• git grep
• git log
• git merge
• git push
• git rebase
• git reset
• git show
• git tag
9.Alias:
• git config --global alias.<alias> <command>
10.Hook:
• git config --local core.hooksPath <path>
11.Experimental: (May not be fully Supported)
• git annex
• git am
• git cherry-pick --upstream
• git describe
• git format-patch
• git fsck
• git gc
• git help
• git log --merges
• git log --oneline
• git log --pretty=
• git log --short-commit
• git log --stat
• git log --topo-order
• git merge-ours
• git merge-recursive
• git merge-subtree
• git mergetool
• git mktag
• git mv
• git patch-id
• git p4
• git prune
• git pull --rebase
• git push --mirror
• git push --tags
• git reflog
• git replace
• git reset --hard
• git reset --mixed
• git revert
• git rm
• git show-branch
• git show-ref
• git show-ref --heads
• git show-ref --tags
• git stash save
• git subtree
• git taq --delete
• git tag --force
• git tag --sign
• git tag -f
• git tag -I
• git tag --verify
• git unpack-file
• git update-index
• git verify-pack
• git worktree
3 notes
·
View notes
Text
Today I improved "git-cotree --init" to handle several edge cases, primarily involving untracked and ignored files. Previously its support for untracked or ignored files was rather limited, covering only the most basic of cases.
But one big goal of git-cotree was to make switching from a normal clone to a nice multiple worktrees setup seamless, and this brings it a lot closer to that goal.
So I am now a lot more confident recommending git-cotree for others to use. I still don't know when I'll actually flesh out the README, but at least now the risk is a lot lower.
However, I'm not sure what happens if for example Git submodules or Git LFS are in the picture. But odds are now good that any remaining issues are due to limitations in how multiple Git worktrees interact with some other Git feature rather than the fault of git-cotree specifically.
2 notes
·
View notes
Text
0 notes
Text
In questo articolo vedremo come creare un ambiente Git completo e simulare il deploy automatico, utilizzando delle semplici cartelle locali su un'unità (come la Z:) per rappresentare server remoti separati per produzione (main) e sviluppo/test (dev). Vedremo anche i vantaggi pratici, esempi reali e best practice nella gestione degli ambienti tramite Git. Sommario ✅ Preparazione dei repository bare 🔐 autorizzare le cartelle per Git 📂 struttura consigliata delle cartelle 🚀 configurare script di deploy automatico 💻 collegare il progetto locale ai remoti 🌐 esempio per server remoto reale 📌 vantaggi del deploy automatico con Git ⚙️ best practice nella gestione dei branch ✅ best practice commit 🔧 guida comandi Git tradotti 💡 consigli finali ✅ Preparazione dei repository bare I repository bare simulano server Git remoti, come GitHub o GitLab. Creali così: mkdir "Z:\Git Remote\progetto1-main.git" cd "Z:\Git Remote\progetto1-main.git" git init --bare mkdir "Z:\Git Remote\progetto1-dev.git" cd "Z:\Git Remote\progetto1-dev.git" git init --bare 🔐 Autorizzare le cartelle per Git Git potrebbe bloccare operazioni su percorsi non sicuri. Per evitarlo autorizza le cartelle: git config --global --add safe.directory "Z:/Git Remote/progetto1-main.git" git config --global --add safe.directory "Z:/Git Remote/progetto1-dev.git" 📂 Struttura consigliata delle cartelle Z:/Git Remote/ ├── progetto1-main.git/ # repo per produzione │ └── hooks/post-receive # script deploy ├── progetto1-dev.git/ # repo per sviluppo │ └── hooks/post-receive # script deploy ├── deploy/ │ ├── progetto1-main/ # deploy produzione │ └── progetto1-dev/ # deploy sviluppo/test 🚀 Configurare script di deploy automatico Crea script post-receive nei repository bare. Per produzione (main): #!/bin/bash while read oldrev newrev ref do if [ "$ref" = "refs/heads/main" ]; then echo "Deploy ramo MAIN" GIT_WORK_TREE="Z:/Git Remote/deploy/progetto1-main" git checkout -f main fi done Per sviluppo (dev): #!/bin/bash while read oldrev newrev ref do if [ "$ref" = "refs/heads/dev" ]; then echo "Deploy ramo DEV" GIT_WORK_TREE="Z:/Git Remote/deploy/progetto1-dev" git checkout -f dev fi done ⚠️ Salva questi script senza estensione, con terminazione LF e codifica UTF-8 (senza BOM). 💻 Collegare il progetto locale ai remoti Dal progetto locale: git init -b main git remote add production "Z:/Git Remote/progetto1-main.git" git remote add development "Z:/Git Remote/progetto1-dev.git" # Se il branch dev non esiste ancora git checkout -b dev # Push iniziali git checkout main git push -u production main git checkout dev git push -u development dev 🌐 Esempio per server remoto reale Per effettuare un deploy su un server remoto reale (es. Linux): # Dal repository locale git remote add production [email protected]:/var/git/progetto1-main.git # Sul server remoto mkdir -p /var/git/progetto1-main.git cd /var/git/progetto1-main.git git init --bare # Configurare post-receive: vi /var/git/progetto1-main.git/hooks/post-receive #!/bin/bash while read oldrev newrev ref do if [ "$ref" = "refs/heads/main" ]; then echo "Deploy ramo MAIN" GIT_WORK_TREE="/var/www/progetto1-main" git checkout -f main fi done chmod +x /var/git/progetto1-main.git/hooks/post-receive 📌 Vantaggi del deploy automatico con Git Riduzione errori: automatizzando, eviti errori manuali. Coerenza ambienti: codice uniforme in sviluppo, test e produzione. Velocità di rilascio: tempi ridotti per deploy. Rollback semplificato: facile ritorno alle versioni precedenti. Semplificazione gestione ambienti: automatizzare significa ridurre la complessità della gestione manuale. Documentazione implicita: ogni commit e deploy è tracciato chiaramente. ⚙️ Best practice nella gestione dei branch Usa branch distinti per dev, staging, e main (produzione).
Proteggi branch principali (main e staging) con pull request obbligatorie. Automatizza promozione tra ambienti con script o pipeline locali. Usa feature branch per nuove funzionalità e bugfix per maggiore chiarezza. ✅ Best practice commit Utilizza l’imperativo presente: aggiungi campo telefono al form correggi bug validazione email rimuovi file obsoleto 🔧 Guida comandi Git tradotti Comando GitItalianoDescrizionegit initinizializza repocrea repo localegit clone clona repocopia repo remotogit statusstato repomostra cambiamentigit add aggiungi fileprepara file al commitgit commit -m "msg"registra modificasalva modifichegit pushinvia modificheinvia commit al remotogit pullrecupera e unisci modificheaggiorna repo localegit merge unisci ramocombina ramigit checkout cambia ramosposta ramo attivogit checkout -festrai file nel sistemacopia file in cartella targetgit logstorico commitcronologia commit 💡 Consigli finali Questa simulazione è ideale per ambienti locali e aiuta team e clienti a comprendere Git in modo semplice ed efficace, facilitando l'adozione di pratiche moderne e collaborative di sviluppo.
0 notes
Text
Compiling Perl Kit v1.0
Question
How to compile it?
Answer
Start by installing the required packages ('gcc', 'yacc' and 'make') in a target system. It might not compile when you have an old version of make. If you're on Cygwin, check that you have GNU Make 4.4.1 or so.
Fetch the files from GitHub. The project can't built when sources have CRLF line endings. Either don't fetch with CRLF line endings or convert line endings to LF.
git config --global core.autocrlf false git init git remote add origin https://github.com/Stagyrite/Perl-1.0.git git pull origin main
Now you can compile a 'perl' program.
./Configure make depend make
The same can be done in the 'x2p' subdirectory.
cd x2p cp ../Configure . ./Configure make depend make
One might want to run all tests from the 't' directory, as those all pass, at least on Cygwin.
Check out the original Q&A.
0 notes
Text
Code Like a Pro: 10 Must-Have VS Code Extensions for 2025 Visual Studio Code (VS Code) continues to dominate the development world in 2025 as one of the most flexible and feature-rich code editors available. Its real strength lies in its extensions, allowing developers to tailor their workspace for maximum productivity. In this article, we’re highlighting the 10 essential VS Code extensions for developers in 2025, curated to enhance your coding experience across web, backend, DevOps, and cloud-based development. Criteria for Selection The extensions featured in this article were chosen based on: Popularity & Ratings on the Visual Studio Code Marketplace. Practical Functionality that streamlines everyday development tasks. Community Support & Updates ensuring long-term reliability. Impact on Productivity, including faster debugging, better code quality, and easier collaboration. This list is curated for a broad range of developers: web developers, full-stack engineers, DevOps professionals, and beyond. Top 10 Essential VS Code Extensions for Developers in 2025 1. Prettier – Code Formatter Primary Functionality: Automatic code formatting. Key Features: Supports multiple languages (JavaScript, TypeScript, CSS, HTML, JSON, etc.). Enforces consistent style across your team. Integrates with Git hooks. Use Cases: Automatically format your code on save to keep it clean. Install & Use: Search for “Prettier - Code formatter” in the Extensions tab or install it via Prettier Marketplace Page. Configuration Tips: Add a .prettierrc config file for project-wide formatting rules. 2. ESLint Primary Functionality: JavaScript and TypeScript linting. Key Features: Detects syntax and style issues. Auto-fix functionality for many issues. Customizable rulesets. Use Cases: Ensure clean, consistent code in large projects. Install & Use: Install via ESLint Marketplace Page. Configuration Tips: Use eslint --init to generate your config file quickly. 3. Live Server Primary Functionality: Launch a local development server with live reload. Key Features: Auto-refreshes the browser when you save changes. Supports HTML, CSS, JavaScript. Use Cases: Ideal for frontend developers working with static files. Install & Use: Install from Live Server Marketplace Page and click "Go Live" in the status bar. Configuration Tips: Customize the default port and browser in settings.json. 4. GitLens – Git Supercharged Primary Functionality: Enhances Git capabilities in VS Code. Key Features: Inline blame annotations. History and commit navigation. Side-by-side diffs and visual file history. Use Cases: Great for tracking changes and understanding code evolution. Install & Use: Available on GitLens Marketplace Page. Configuration Tips: Enable code lens for inline author info at the top of functions. 5. Bracket Pair Colorizer 2 Primary Functionality: Colorizes matching brackets. Key Features: Nested brackets get unique colors. Enhances code readability in deeply nested code. Use Cases: Especially useful in languages like Python, JavaScript, and C++. Install & Use: Get it from the Marketplace Page. Configuration Tips: Customize color settings in settings.json for better visibility. 6. Auto Rename Tag Primary Functionality: Automatically renames matching HTML/XML tags. Key Features: Saves time editing HTML, JSX, and XML. Use Cases: Quickly update tags in large HTML files. Install & Use: Install from Auto Rename Tag Marketplace Page. Configuration Tips: Works seamlessly with HTML and JSX files out of the box. 7. Code Spell Checker Primary Functionality: Highlights spelling errors in code comments, strings, and documentation. Key Features: Multi-language support. Personal dictionary feature.
Use Cases: Prevent embarrassing typos in documentation and comments. Install & Use: Find it on the Marketplace Page. Configuration Tips: Add common project terms to .cspell.json. 8. Docker Primary Functionality: Manage Docker containers, images, and registries. Key Features: Build and run containers directly from VS Code. Visual UI for managing Docker assets. Use Cases: Perfect for DevOps and containerized development. Install & Use: Get it via the Docker Extension Marketplace Page. Configuration Tips: Integrate with Docker Compose for advanced workflows. 9. Remote – SSH Primary Functionality: Develop on remote machines over SSH. Key Features: Seamlessly code on remote Linux servers. Works with local VS Code UI. Use Cases: Great for working with cloud-based dev environments. Install & Use: Install from Remote - SSH Marketplace Page. Configuration Tips: Store SSH targets in ~/.ssh/config for quick access. 10. IntelliSense for Specific Languages (e.g., Python, Java, C++) Primary Functionality: Smart code completions based on language semantics. Key Features: Offers autocompletion, method suggestions, and parameter hints. Integrates with language servers (e.g., PyLance for Python). Use Cases: Enhances coding experience for language-specific tasks. Install & Use: Example: Python Extension, C++ Extension. Configuration Tips: Enable IntelliSense features like auto-imports in settings.json. Benefits of Using VS Code Extensions VS Code extensions offer numerous benefits, including: Increased Productivity: Automate repetitive tasks and get more done in less time. Improved Code Quality: Catch errors and enforce coding standards with linters and formatters. Streamlined Workflows: Integrate with tools like Git, Docker, and SSH directly in your editor. Enhanced Collaboration: Consistent formatting and intelligent annotations improve team workflows. Staying Updated with Extensions To keep your extensions updated: Go to the Extensions view, and click the "Update" button if visible. Use Ctrl+Shift+P → "Extensions: Check for Updates". Explore trending extensions from the VS Code Marketplace. Conclusion With the right VS Code extensions, your development environment becomes more powerful, responsive, and tailored to your workflow. The 10 extensions listed above are tried-and-tested tools that can dramatically boost your coding productivity in 2024. Explore, experiment, and customize your setup to match your development style. And don't forget to share your favorite VS Code extensions with the developer community! Suggested External Links: VS Code Marketplace Official VS Code Documentation ✅ Note: All extensions listed are actively maintained and compatible with the latest VS Code 2025 version.
0 notes
Text
A beginners guide to GIT: Part 4 - How to use GIT as 1 person
Table of content: Part 1: What is GIT? Why should I care?
Part 2: Definitions of terms and concepts
Part 3: How to learn GIT after (or instead of ) this guide.
Part 4: How to use GIT as 1 person
Part 5: How to use GIT as a group.
When it comes to not getting in each other's way, working alone is the simplest (It has a lot of other drawbacks). This is the simplest way to use GIT. You can do it with an external repository as a backup or just locally on your computer. It depends on how important your project is. If your laptop crashes tomorrow, which projects would you have a really hard time losing? Better to have an external backup for that. Github is often used for this (Maybe less now that Github makes machine learning AI’s, and so ARE stealing your code to train their AI on.) but you can also use Bitbucket (Which... may also steal your code...) and there are many many others out there. GIT is often used in certain patterns, called “workflows”. These have you working in more or less rigid ways to make it simple to work together. But since you are working alone, you do not risk others changing your code while you are working, so you can do it the simplest way :D
I will be doing a step by step guide that you can follow along. I will be doing it on a completely empty project and making a tiiiiiny program in C. This is because it is super simple. You do NOT have to know C to follow. You can also follow the steps with your own already existing project.
I PROMISE you, GIT cannot hurt you. Worst case scenario is that you fiddle around and break the repository part. (Meaning the files in the .git folder). But your files will always be safe.
(If you do not have git installed, check out part 3 for that)
First, I make a folder, navigate my shell into it, and call git init:
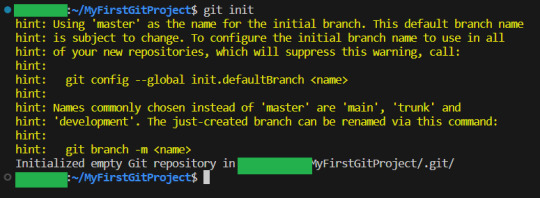
By the way, you can get used to GIT messages like this that tell you all your options, and explain what GIT has done for you. GIT is very good about giving you as much help and info as possible,
Now I will teach you the most important command in GIT.
It is more important than any other. Ready?
git status

This makes GIT tell you what git thinks is happening right now. What issues there are and what files are tracked, untracked or have been changed. Use this command often, especially while you are new to GIT, run it after every other command. It is how you learn what GIT is doing and thinking :3
Since our repo is empty it tells you what branch you are on (master. The only branch we will need since we are working alone)
and that you have not made any commits.
It also tells you the commands git think you will want to use on files. Since our repository is empty, it tells us to create some files, and then how to add them :3 So let's do that:
I have added my tiny program, as you can see:
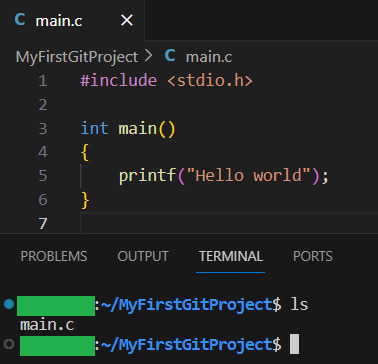
Now let us see what GIT thinks we did:
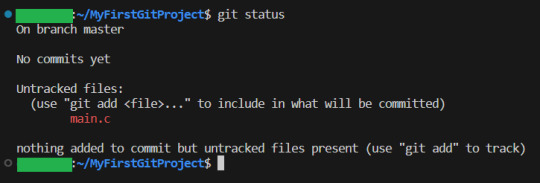
Now, since there have been changes, git shows us them.
Files can be untracked tracked and not changed (In which case, git status does not show them) tracked and changed.
Right now, main.c is untracket. Which basically means GIT have no idea about this file, other than it is in the folder.
Ok, let us commit(save) the file. GIT tells us this is done with git add <File> . So we will write git add main.c
Then we use git status again to see what happened git status
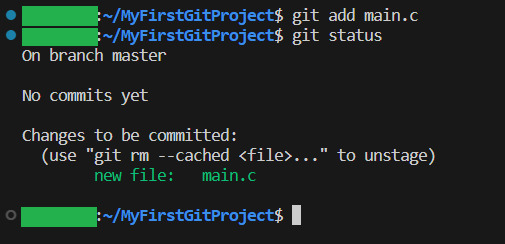
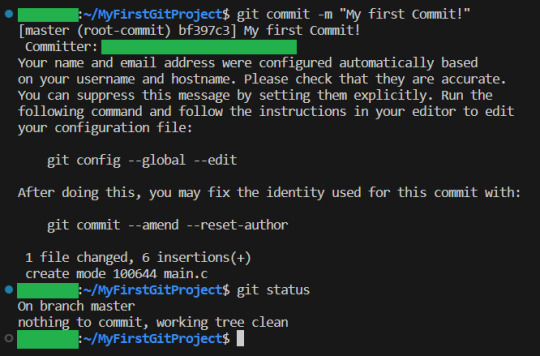
And yeah, our file is now ready to be committed. So lets do it! git commit -m “My first commit!”
The “-m” option is to write the git update explanation directly in the console instead of using an external program to do it. Done You have now committed your code! It is now saved!
git status shows that everything in the working tree is as it was last time we committed (Duh. We JUST committed)
I will now make some changes to the main file:

Git status shows us main.c was changed...but what if we wanted to know what was changed in more detail? How will we get status to do that for us? Let us find out! git help status
git then shows the help page for status And there we can see this part:

So if we write status with 2 -v arguments, we get all the details. Let us try:
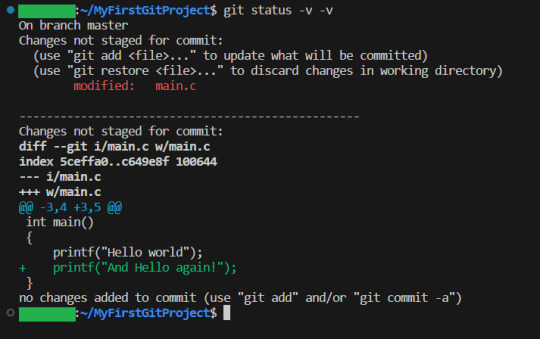
And look! It shows us EXACTLY what lines were changed! I stage the changes and commit:
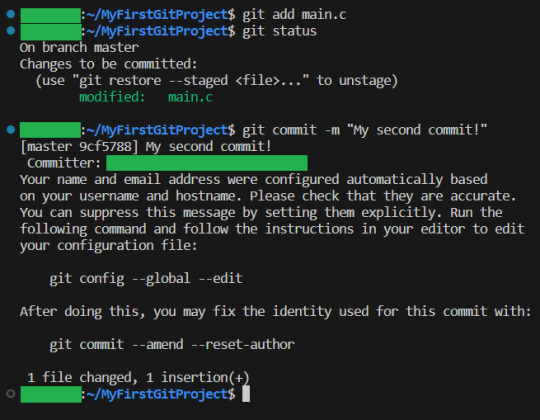
And you have now learning enough about GIT to use it.. You now have all your work saved, in different commits. If you ever want to know all the commits you have made, write git log:
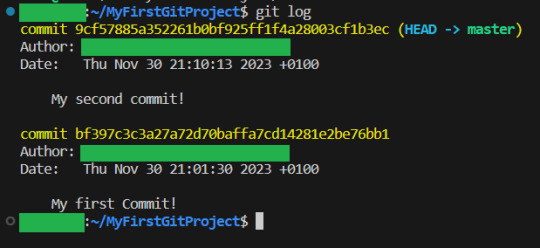
And if you want to know what a specific commit did, you copy the name of the commit, and write git show:

Now, everytime you want to save your work, you
1: Write/change the files you want
2: Add the files you want as part of this commit
3: make the commit These three steps are your workflow.
If you have a remote repository, then you add them steps
4: push to remote repository
To do this step, you can actually just write
git push
If you have set up a remote repository, then it just works. If you have not, then git will tell you what to do Whichever remote repository you use will tell you if you need to do other steps, like setting up passwords or ssh keys. They will also tell you how to set up the remote repository (That is not a GIT thing, that is a bitbucket or a github thing, so refer to whichever of those sites you want to use) And that is all! Every time you commit, your project is saved (it is smart to commit often, but usually only commit when your project can be compiled.) And whether you use a remote repository or not, you now have a fully valid GIT repository, and all the git tricks can be used on your project!
39 notes
·
View notes
Text

Learn Git & GitHub: The Backbone of Modern Development
Mastering Git and GitHub is essential for anyone venturing into software development, data science, or collaborative projects. Git, a distributed version control system, allows you to track changes in your code, revert to previous versions, and collaborate seamlessly with others. GitHub, built on top of Git, provides a cloud-based platform to host your repositories, manage pull requests, and contribute to open-source projects.
Starting with Git involves setting up your local environment, configuring your username and email, and learning basic commands like git init, git add, git commit, and git push. Once comfortable, you can explore GitHub to host your repositories, collaborate with others, and even deploy your projects using GitHub Pages.
For beginners, platforms like Codecademy offer interactive courses to get you started . Additionally, freeCodeCamp provides comprehensive tutorials covering Git and GitHub basics .
#Git #GitHub #VersionControl #SoftwareDevelopment #OpenSource #Collaboration #Coding #DeveloperTools #LearnToCode #GitTutorial #GitHubTutorial #Programming #TechSkills #CodeNewbie #VersionControlSystem
0 notes
Text
Как управлять версиями кода с помощью Git?
Когда я только начал работать в стартапе, занимающемся созданием сайтов и мобильных приложений, я понял, как важно правильно управлять версиями кода. В особенно быстрых и динамичных проектах, как у нас, где разработка ведется параллельно и над несколькими функциями, использование системы контроля версий становится жизненно важным. Одним из самых популярных и мощных инструментов для этого является Git.
Git позволяет управлять версиями кода, отслеживать изменения, работать с разными ветками и эффективно координировать командную работу. Он также особенно полезен при разработке мобильных приложений, где требуется быстро вносить изменения и легко откатываться к предыдущим версиям. В этой статье я расскажу, как использовать Git для управления версиями и о базовых принципах работы с ним.
Что такое Git и зачем он нужен?
Git — это система контроля версий, которая позволяет разработчикам отслеживать изменения в коде, работать над проектами совместно и контролировать историю всех изменений. Git позволяет создавать локальные копии репозиториев, синхронизировать их с удалёнными серверами, создавать ветки и комбинировать их, а также откатывать изменения.
Когда вы занимаетесь созданием сайтов или мобильных приложений, очень важно не потерять важные изменения в коде, особенно если над проектом работают несколько человек. Git помогает вам не только избежать таких проблем, но и улучшить общую эффективность работы.
Основные команды Git
git init Эта команда инициализирует новый репозиторий Git в директории вашего проекта. Она позволяет начать использовать Git для отслеживания изменений.
git clone <url> Если вы хотите работать с уже существующим проектом, можно клонировать репозиторий с помощью команды git clone <url>, где URL — это ссылка на удалённый репозиторий.
git add <file> После того как вы внесли изменения в код, используйте команду git add <file> для добавления этих изменений в индекс, который будет сохранён в коммите.
git commit -m "message" Когда изменения готовы, выполните команду git commit -m "сообщение", чтобы зафиксировать их в истории проекта. Важно писать понятные и лаконичные сообщения, чтобы команда могла легко понять, что было изменено.
git push Для того чтобы отправить локальные изменения на удалённый репозиторий, используйте команду git push. Это позволяет синхронизировать вашу локальную работу с работой команды.
git pull Чтобы получить изменения с удалённого репозитория и синхронизировать их с вашим локальным проектом, используйте команду git pull.
Работа с ветками
Одна из сильных сторон Git — это возможность работать с ветками. Ветки позволяют изолировать различные изменения, тестировать новые функции, исправлять ошибки или разрабатывать новые идеи без вмешательства в основную кодовую базу. Это особенно полезно в мобильных приложениях, когда нужно внедрить новую фичу или интеграцию с внешним сервисом, не затрагивая текущую стабильную версию.
git branch Эта команда позволяет увидеть все ветки, которые существуют в проекте.
git checkout -b <branch-name> Команда git checkout -b <branch-name> используется для создания новой ветки и перехода на неё. Например, если вам нужно добавить новую фичу, можно создать ветку под названием feature-login.
git merge <branch-name> Когда работа над функцией завершена, вы можете объединить её изменения с основной веткой (обычно это main или master), используя команду git merge <branch-name>.
Рекомендации по использованию Git в команде
Частые коммиты. Делайте коммиты часто, чтобы легко отслеживать изменения и избегать потери данных. Также это облегчает процесс отката к предыдущим версиям ко��а.
Чистота истории. Важно, чтобы история коммитов была понятной и структурированной. Используйте осмысленные сообщения для коммитов и следуйте правилам кодирования, чтобы история оставалась читаемой.
Использование pull-request'ов. Когда работаете в команде, полезно использовать pull-request’ы для объединения веток. Это позволяет членам команды проверять код перед его слиянием с основной веткой, повышая качество и стабильность кода.

Git — это незаменимый инструмент для любого разработчика, особенно когда вы работаете над проектами, такими как создание сайтов и мобильных приложений, где важна синхронизация командной работы и контроль версий. Git позволяет вам не только отслеживать изменения, но и работать более гибко, эффективно и безопасно. Правильное использование Git в проекте помогает избежать многих проблем и улучшить рабочий процесс.
Если у вас есть вопросы по Git или вы хотите узнать больше о том, как его применять в разработке мобильных приложений, пишите в комментариях — буду рад помочь!
0 notes
Text
Flexpeak - Front e Back - Opções
Módulo 1 - Revisão de JavaScript e Fundamentos do Backend: • Revisão de JavaScript: Fundamentos • Variáveis e Tipos de Dados (let, const, var) • Estruturas de Controle (if, switch, for, while) • Funções (function, arrow functions, callbacks) • Manipulação de Arrays e Objetos (map, filter, reduce) • Introdução a Promises e Async/Await • Revisão de JavaScript: Programação Assíncrona e Módulos • Promises e Async/Await na prática Módulo 2 – Controle de Versão com Git / GitHub • O que é controle de versão e por que usá-lo? • Diferença entre Git (local) e GitHub (remoto) • Instalação e configuração inicial (git config) • Repositório e inicialização (git init) • Staging e commits (git add, git commit) • Histórico de commits (git log) • Atualização do repositório (git pull, git push) • Clonagem de repositório (git clone) • Criando um repositório no GitHub e conectando ao repositório local • Adicionando e confirmando mudanças (git commit -m "mensagem") • Enviando código para o repositório remoto (git push origin main) • O que são commits semânticos e por que usá-los? • Estrutura de um commit semântico: • Tipos comuns de commits semânticos(feat, fix, docs, style, refactor, test, chore) • Criando e alternando entre branches (git branch, git checkout -b) • Trabalhando com múltiplos branches • Fazendo merges entre branches (git merge) • Resolução de conflitos • Criando um Pull Request no GitHub Módulo 3 – Desenvolvimento Backend com NodeJS • O que é o Node.js e por que usá-lo? • Módulos do Node.js (require, import/export) • Uso do npm e package.json • Ambiente e Configuração com dotenv • Criando um servidor com Express.js • Uso de Middleware e Rotas • Testando endpoints com Insomnia • O que é um ORM e por que usar Sequelize? • Configuração do Sequelize (sequelize-cli) • Criando conexões com MySQL • Criando Models, Migrations e Seeds • Operações CRUD (findAll, findByPk, create, update, destroy) • Validações no Sequelize • Estruturando Controllers e Services • Introdução à autenticação com JWT • Implementação de Login e Registro • Middleware de autenticação • Proteção de rotas • Upload de arquivos com multer • Validação de arquivos enviados • Tratamento de erros com express-async-errors Módulo 4 - Desenvolvimento Frontend com React.js • O que é React.js e como funciona? • Criando um projeto com Vite ou Create React App • Estruturação do Projeto: Organização de pastas e arquivos, convenções e padrões • Criando Componentes: Componentes reutilizáveis, estruturação de layouts e boas práticas • JSX e Componentes Funcionais • Props e Estado (useState) • Comunicação pai → filho e filho → pai • Uso de useEffect para chamadas de API • Manipulação de formulários com useState • Context API para Gerenciamento de Estado • Configuração do react-router-dom • Rotas Dinâmicas e Parâmetros • Consumo de API com fetch e axios • Exibindo dados da API Node.js no frontend • Autenticação no frontend com JWT • Armazenamento de tokens (localStorage, sessionStorage) • Hooks avançados: useContext, useReducer, useMemo • Implementação de logout e proteção de rotas
Módulo 5 - Implantação na AWS • O que é AWS e como ela pode ser usada? • Criando uma instância EC2 e configurando ambiente • Instalando Node.js, MySQL na AWS • Configuração de ambiente e variáveis no servidor • Deploy da API Node.js na AWS • Deploy do Frontend React na AWS • Configuração de permissões e CORS • Conectando o frontend ao backend na AWS • Otimização e dicas de performance
Matricular-se
0 notes